Adventures in Baby Food Making - Week 1: Sweet Potatoes
SWEET POTATOES - Week #1 - Solid Food #1
So after giving up on making cereal for the reasons that I presented in my last blog, I progressed into making the "real" solid foods.


After researching which food I should begin with, I chose sweet potatoes. I'm one of those moms that didn't want to start with fruits for the fear of him not liking the veggies later.
So this is how I made homemade sweet potatoes using the Food Cube Method.
Step One - Select
Select your organic sweet potatoes that are thick, chunky and taper at the ends. Refrain from purchasing vegetables that have wax on them.
Step Two - Clean and Prep
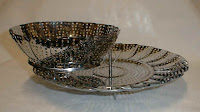
Scrub the potatoes clean and place the in your steamer. We had a steamer in our rice cooker, but is definitely not large enough for making baby food. Therefore, I went to Target and purchased a cheap one that can fit inside of one of our pots. Place enough water in bottom of pot that the water touches the bottom of the veggies.

Our food steamer

Potatoes cleaned and ready to steam
Step Three - Steam
Cover the pot and steam for 30 minutes - Stopping at 15 minutes to turn the potatoes over.

Step 4: Puree Prep
Cut cooked potatoes in half and place in mixer. We are using a mixer instead of a blender or food processor, as the mixing beaters will collect more of the stringy fibers and leave the mash much more smooth. If you want, you can transfer to a blender afterwards to create even more of a smooth texture since the skins will stay on....your choice.

Step 5 - Puree
Blend away!
When the consistency is to your liking, it is time to start the Food Cube Method.
You will need to pick out large pieces of skin and strings to prevent a choking hazard.
Step 6 - Ice Cube Tray Prep
Make sure to select ice cube trays that are of the "good" plastics. They may say "BPA Free." If not, flip them over and look for the plastic number - "4, 5, 1 or 2....all the rest are bad for you"


Step 7 - Fill the Trays
Fill the ice cube trays with 1 tablespoon of puree. Standard ice cube trays hold 2 tablespoons, but you can measure yours with water.

Step 8 - Cover and Freeze
Cover your ice cube trays with aluminum foil and place in freezer - apart from each other - for approximately 8-12 hours - until frozen.

Step 9 - Bag the Puree
Remove the trays from the freezer and empty the cubes out.

Place in secure freezer bags - The puree will be good for up to 2 months in the freezer or up to 10 days in the refrigerator.

Make sure to label your bags!

Step 10 - Defrosting
The easiest way is to think ahead. Take out enough frozen cubes for the next day and place them in a sandwich bag and put in the refrigerator overnight. If you want to heat them up, you can place in a non-plastic container in the microwave for 5 seconds. A baby at 6 months old will probably eat only 1 tablespoon of veggies along with their cereal.

Step 11 - Sit back and enjoy the expressions!


Remember....in order to accurately determine allergic reactions to new food, follow the 4 day plan. This is simply to only provide a new food to your child after 4 days of exposure. Also, make sure to give the new food in the morning, rather than at night, so that you can monitor for reactions.
Have fun!
T-2 days until a new food!
Stay tuned!


Comments
hiii
I am your newest follower and would looove a follow back Thanks!!
http://stashmama.blogspot.com/
Btw I loove your blog!
Thanks for becoming a follower! :)
http://haltonmom.blogspot.com